 Xem Studiomeasured geometry
Library › Electronics › Generators & alternators ·
Linear alternator module, 2 in, open frame (exposed flexures)
The same linear alternator on an open frame: it clamps on the end of an unpressurised engine with one 2 in ferrule face, and the leaves, the mover's ends and the stator sit in the open where you can see and reach them.
Ø48 piston ±5 mm (±6 max) · moving mass 899 g · leaves 8851 N/m · Bl 28.8 N/A · coil 3.40 Ω, ≈25 mH · f₀ 15.8 Hz on the leaves alone · back open to the room · 167.7 mm from face A
Exact dimensions. Every part is drawn at true size with no printing tolerance; each part's page lists its mating features and the fit each joint needs, so open those by your process's clearance before making the parts.
Long Earth Society build part. Complete parts list. The engines
116 parts, every one a file here · all STL URLs · Markdown · tick lines as you go (saved in this browser)
| subsystem | object | parts | qty | note | |
|---|---|---|---|---|---|
| None | Linear alternator module spools | spool-2in-42mm-bored-48.00 STEP · STL | 1 | face A (to the engine) and the piston's cylinder; its second ferrule carries the frame base | |
| None | Linear alternator module open frame | la-frame-base-2in-ferrule STEP · STL | 1 | clamped on the spool's second ferrule; leaf 1's seat on top | |
| None | Tri-clamp gasket | tc-gasket-2in STEP · STL | 2 | Type B at face A (to the engine) and between the spool and the frame base | |
| None | Tri-clamp clamp | clamp-half-2in STEP · STL | 4 | two standard 2 in clamps: face A to the engine, the spool to the frame base | |
| None | Socket head cap screws | shcs-m5x30 STEP · STL | 4 | two per clamp | |
| None | Hex nuts | nut-m5 STEP · STL | 4 | in the clamps' hex traps | |
| None | Tri-clamp flexure leaf | leaf-2in-piston-t0.8 STEP · STL | 2 | choose one leaf set, A (standard 0.8): leaf 1 in the frame base's seat, leaf 2 (turned over, opposite hand) in the seat ring | |
| None | Linear alternator module tuning parts | leaf-2in-piston-t0.5 STEP · STL | 2 | choose one leaf set, B (soft 0.5, tuning): in place of the 0.8 leaves; leaf 2 turned over | |
| None | Linear alternator module tuning parts | la-rim-shim-64x0.3 STEP · STL | 2 | choose one leaf set, B (soft 0.5, tuning): one under each soft leaf's rim in its seat | |
| None | Linear alternator module open frame | la-frame-leaf-clamp-ring-80-posts10 STEP · STL | 1 | on leaf 1's rim, posts up | |
| None | Linear alternator module open frame | la-frame-stator-sleeve-48x66 STEP · STL | 1 | on the posts; the stator round it | |
| None | Linear alternator module open frame | la-frame-stator-top-plate-80-posts5 STEP · STL | 1 | on the sleeve's top flange, posts up | |
| None | Linear alternator module open frame | la-frame-leaf-seat-ring-80 STEP · STL | 1 | on the top plate's posts; leaf 2's seat on top | |
| None | Linear alternator module open frame | la-frame-leaf-clamp-ring-80 STEP · STL | 1 | on leaf 2's rim | |
| None | Socket head cap screws | shcs-m3x25 STEP · STL | 3 | down through the sleeve's lower flange, the posts and the lower clamp ring into the frame base | |
| None | Socket head cap screws | shcs-m3x12 STEP · STL | 3 | down through the top plate into the sleeve's top flange | |
| None | Socket head cap screws | shcs-m3x16 STEP · STL | 3 | down through the upper clamp ring and the seat ring into the top plate's posts | |
| None | Linear alternator module mover | la-piston-cup-48x24 STEP · STL | 1 | in the 42 bored spool, crown toward face A | |
| None | Linear alternator module mover | la-tube-rod-18x14x151.70 STEP · STL | 1 | pressed into the cup's socket; through both leaves | |
| None | Linear alternator module mover | la-magnet-carrier-47x56 STEP · STL | 1 | pressed on the tube rod, centred in the stator sleeve | |
| None | Neodymium disc magnets | magnet-12x3 STEP · STL | 40 | 4 rows of 10 in the carrier, faces out: S, N, N, S from face A | |
| None | Leaf hub collars | fpse-collar-18x28 STEP · STL | 4 | either side of each leaf's hub on the tube rod | |
| None | Set screws (grub screws) | set-m3x4 STEP · STL | 4 | one grub per collar | |
| None | Moving-magnet linear alternator stator o | fpse-stator-pack-43deg STEP · STL | 8 | round the stator sleeve at the magnets' centre | |
| None | Moving-magnet linear alternator stator o | fpse-bobbin-65 STEP · STL | 1 | between the teeth; slid over the sleeve's Ø64 top flange first | |
| None | Moving-magnet linear alternator stator o | fpse-coil-300t STEP · STL | 1 | 300 turns of 0.71 mm enamelled wire on the bobbin; the leads leave through the housing | |
| None | Moving-magnet linear alternator stator o | fpse-stator-housing-half STEP · STL | 2 | clamp the packs onto the sleeve | |
| None | Socket head cap screws | shcs-m4x20 STEP · STL | 4 | stator housing ears | |
| None | Hex nuts | nut-m4 STEP · STL | 4 | stator housing ears | |
| None | Linear alternator module tuning parts | la-mass-disc-41x26x4 STEP · STL | 4 | optional (tuning): add-on mass discs on the crown inside the cup, 0 to 4 | |
| None | Socket head cap screws | shcs-m3x20 STEP · STL | 3 | optional (tuning): hold 4 discs (3 × M3 × 16 for 3, × 12 for 2, × 8 for 1) | |
| None | Linear alternator module | 1 | load resistor: non-inductive, power rated above the expected output; value on the datasheet: bought, not drawn | ||
| None | Linear alternator module | 1 | series capacitor: non-polar, C = 1/(ω² L) for the running frequency (datasheet), rated above the voltage across it: bought, not drawn |
Assembled engine
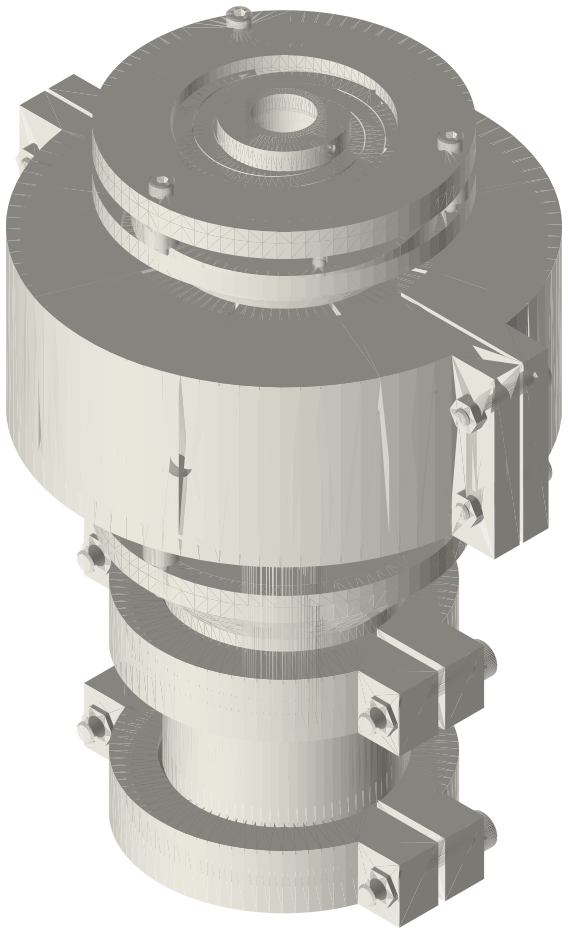
A clamp-in linear alternator module on an open frame: a 42 mm bored 2 in tri-clamp spool with a 48 mm clearance-seal piston on face A, and on its second ferrule an open frame carrying two exposed spiral leaves, the 40-magnet carrier in a stator sleeve and the laminated stator and coil, the back of the piston open to the room; about 140 × 116 × 180 mm.
Assembly STEP (3.5 MB) · STL (5.2 MB) · 103 parts
Build order
- Magnets into the carrier (rows S, N, N, S from the end that faces A), carrier pressed on the tube rod at its drawn place, tube pressed into the cup's socket. Mass discs on the crown now if the tuning needs them.
- Coil on its bobbin over the sleeve's Ø64 top flange to the middle; eight stator packs round the sleeve at the coil; housing halves with 4 × M4 × 20. Leads out through the housing's hole.
- 42 bored spool face A down. Mover in, crown down, until the crown is 9.00 below face A (depth gauge). Type B gasket and frame base on the spool's top ferrule; clamp. Collar on the tube, leaf 1 into the base's seat, collar; lower clamp ring posts up; the sleeve with its stator onto the posts; 3 × M3 × 25 into the base; grubs.
- Top plate on the sleeve (3 × M3 × 12), seat ring on its posts, collar, leaf 2 turned over into the seat, upper clamp ring (3 × M3 × 16), collar; check the crown is still at 9.00 and the mover moves freely ±6 by hand from face A.
- Face A: Type B gasket and clamp onto the engine. Load resistor and capacitor on the leads before the engine runs.
Questions
When do I use the open frame?
On engines at 1 bar: desk and demo engines, the cold or power end of a tri-clamp Stirling, quick swaps, and whenever you want to see and retune the leaves. For a charged engine, a loop or a ring, use the closed module.
Why is its frequency lower?
Nothing pushes back on the piston but the leaves and the engine's own gas: 15.8 Hz on the leaves alone, higher on an engine (the datasheet lists it for engine volumes from 50 to 400 cm³). The closed module's bounce space is the stiff spring that the open frame leaves out.
Where is the electricity?
Two leads from the coil on the stator housing. Always connect the load before the engine runs.
Agents: each row's object has /api/geometry?object=slug and the MCP tool get_free_files; the STL list above is every part.
JSON: /api/geometry?object=list-linear-alternator-module-2in-open